Are you wondering “How to Setup Canon Printer“? I’ve got your back! Setting up a new printer can sometimes feel challenging, but don’t worry! I have provided a few easy steps in this blog to help you setup your printer in just one go!
The printer setup sounds like an easy process, but not for everyone, especially if you are not tech-savvy. I still remember the day when I had to help one of my best friends with his Canon PIXMA Printer Setup. He was fully frustrated due to his inability to understand that complex user manual. Although I find it very easy to understand, it was not his cup of tea.
In this blog post, I will explain the process in simple, easy-to-follow steps that helped my friend to understand. So grab your favorite beverage, and let’s get your Canon printer up and running smoothly!
Step 1: Preparing the Printer
Before you dive into ‘How to Setup Canon Printer’, you need to prepare your printer for the proper connection and setup process. I have simplified the steps below:
- Look for a flat and horizontal surface and place the printer on it.
- Make sure no objects are placed in front of the printer.
- Then, open the Rear Tray and pull out the paper support.
- Now, open the Front Tray and pull out the Output Tray Extension.
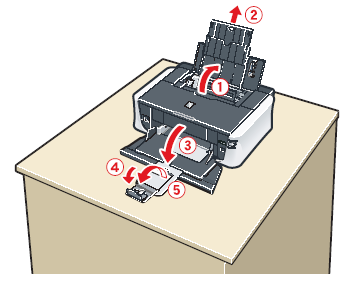
- Next, plug all the printer cables into the wall outlet.
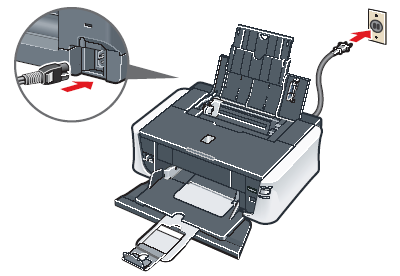
- Switch on the canon printer by clicking on its power button.
- Lift the Top Cover.
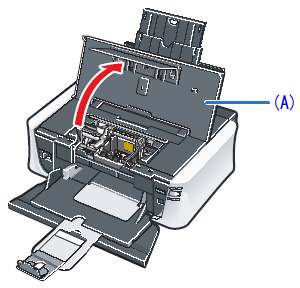
Step 2: Install the Print Head
The print Head is a part of the printer mounted inside the printer, and it sprays ink onto the paper. To “Learn how to Setup Canon Printer”, you need to place the Print Head carefully. Follow the steps to place it on the top of the printer:
- Take the Print Head outside from its package carefully.
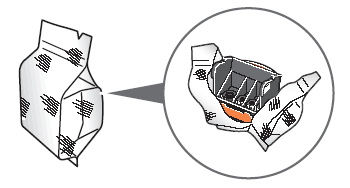
- Detach the orange protective cap and throw it away.
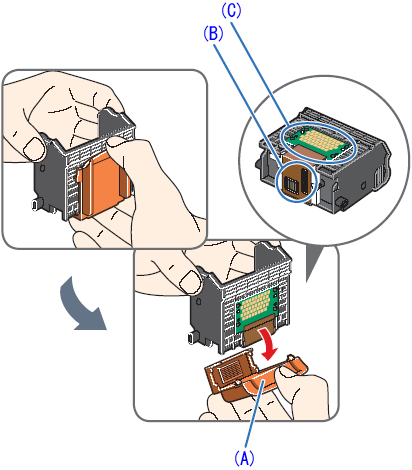
- After that, lift the Print Head Lock Lever until it stops.
- Place the Print Head in the right place.
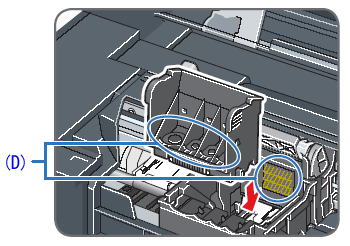
- To secure the Print Head properly in its place, push it and lower it to lock it correctly.
Step 3: Install Ink Tanks
An ink tank is a reservoir that holds the ink and can be refilled once empty. The installation of ink tanks is essential to ensure proper printing. Let us go through the following steps to install the printer ink tanks:
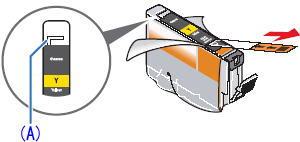
- Remove the protective film by removing the orange tape in the direction of the arrow.
- Take off the orange cap (B) at the bottom of the ink tank and throw it away.
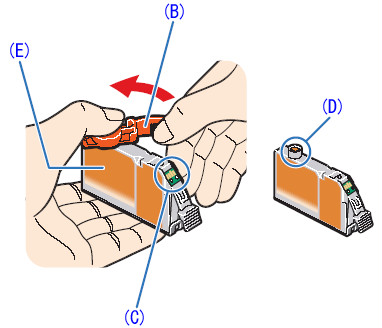
- Put the ink tank in the slot on the right side and press the PUSH mark until you hear a click sound to make sure it’s locked in.

- Here, the ink lamp should light in red color.
- Finally, close the top cover of the printer.
Here is the explanation of how to setup Canon printer end, and now you are ready to install the printer driver to continue printing hassle-free.
Step 4: Install Printer Driver on Windows
A printer driver is an important software that helps the printer to communicate with your Windows PC and translate all the digital data (photos and PDF) into a physical copy. Without a driver, you cannot print anything. Let’s take a look at the two steps explained below:
Downloading Driver
- Go to the Canon Official Website https://ij.start.canon/.
- At the top, find the Support section and click on “Software & Drivers.”
- Scroll down a little and click on “Printer.”
- Choose your printer model from the list. Check if the operating system shown matches your computer. If it doesn’t, select the correct one from the drop-down menu.
- Click the “Download” option to get the printer driver.
- Once the download is complete, move to the next step, which is installing the driver.
Installing Driver
- Open the Downloads file on your PC and double-click on it.
- If a pop-up appears and asks if you want to make changes, click Yes.
- Wait for the files to be extracted on your computer.
- When prompted, click on Start Setup.
- Make sure your PC is connected to the internet since the installer needs it.
- If you see any warnings, let the Setup Wizard start the installation.
- Click Next to keep going.
- When the License Agreement appears, choose Yes to agree.
- After that, select Agree to continue.
- Wait a moment while the setup processes everything.
- Finally, be patient as the installer checks your printer’s status.
Finally, you might have learned ‘how to setup Canon printer‘. Once you have followed the above-described steps, you are ready to print anything.
Frequently Asked Questions (FAQs)
What Is Canon Print Head?
A print head is an important part of Canon inkjet printers. It works by spraying small droplets of ink onto paper to create pictures or text. This process uses heat to push the ink out of the print head and onto the page. Without the print head, we wouldn’t be able to make colorful prints.
How Long Does it take to Install Canon Printer Software?
The printer installation process takes around 20 minutes to complete. However, the actual time can change depending on your computer’s system and how many programs you need to install. So, while 20 minutes is a good estimate, it might take a little longer if you have more applications or if your computer is running slow.