In this fast-paced world, you want everything easily and conveniently done. When you need a computer or a laptop to print your documents, those days are gone. Now, you can print from your smartphone, which makes the printing process easier for you.
Whether you want to print photos, documents, or emails from your Android or iOS mobile devices, you will need to learn ‘how to connect a Canon printer to phone‘. This can save you time and make your printing workflow easier.
Canon printers are widely known and used for their ease of use and reliability. Modern features like connecting them to a mobile device have made this process straightforward. Explore this blog and discover the easy steps to get there.
Steps to Connect Your Printer to Phone
Read the detailed steps to understand how you can connect to your phone.
Step 1: Check if Canon Printer Is Compatible
Before, you begin with how to connect a Canon printer to phone. It is important to make sure that your Canon printer is compatible with mobile printing or not. New models of Canon printers like PIXMA and SELPHY OE imageCLASS series come with in-built W-Fi and mobile printing compatibility through apps like Canon PRINT Inkjet or SELPHY or Apple AirPrint for iOS devices.
Step 2: Download the Canon Print App
After verifying your printer’s compatibility, next download the Canon PRINT app on your mobile device. This app is available for users on both Android and iOS platforms. Follow the below procedures to download the app for both devices:
For Android
If you want to know ‘how to connect a Canon printer to an Android phone‘, then follow the below steps:
1. To start, open the Play Store on your Android device.
2. Now, the search bar looks for the Canon PRINT Inkjet app.
3. Click Download, open the app, and register your printer.
4. After that, connect your device to the same network as your printer.
5. Select the printer from the list of compatible printers.
For iOS
Read the below steps for downloading the app on your iPhone:
- Open the App Store on your iPhone.
- Then, in the search bar, look for the Canon PRINT Inkjet app.
- After that, hit the Download button to get the app and install it.
- Now, open the app, register your printer, and connect your device to the same network as your printer.
Step 3: Connect the Canon Printer to Wi-Fi
Both devices must be on the same network to connect your Canon printer to your phone. Here are steps for connecting the printer to Wi-Fi:
- First, turn on your Canon printer and make sure it is within the range of your Wi-Fi router.
- Press the Wi-Fi button on the printer.
- Go to the Control Panel of your printer and choose Wireless LAN Setup.
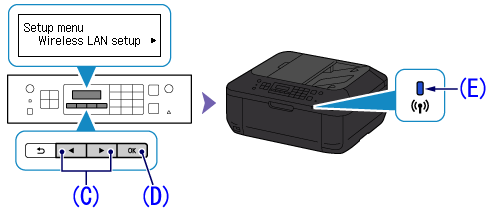
- Afterward, select Standard Setup, then choose your network from the list of available networks.
- Now, enter the password when required.
Step 4: Connect Your Phone to Printer
Now, after connecting your phone and printer to the same network, it is time to learn ‘how to connect a Canon printer to phone‘ using the Canon PRINT app:
- Open the app on your device.
- Then, hit the Add Printer option, and the app will search for available Canon printers on the Wi-Fi network.
- Now, a list of available printers will appear on your screen.
- Select your printer from the list.
As you have connected your printer to your phone now, you can simply take control of your printer with the help of your phone. Now, focus on how you can print from your phone.
Step 5: Print from Your Phone
You have connected the printer to your phone successfully. Read the below steps to know how you can start printing from your phone:
- To begin, open the Canon app and choose the file type, like a photo print document print.
- You can send your files from the storage of your phone or cloud services like Google Drive or iCloud.
- Now, load the paper into the printer and adjust all the print settings, such as paper size, color, and number of copies.
- After adjusting and changing settings according to your requirements, click the Print option and send it for printing.
Note: If you have an iPhone, you can use the Apple AirPrint feature for direct printing. Open the file, hit the Share option, select Print, and select your Canon printer from the list.
In a Nutshell
Connecting your Canon printer to your phone can simplify your printing tasks by following the above steps on ‘how to connect a Canon printer to phone‘. You can easily set up the printer and start printing in no time.
Printing with your phone makes the process much easier because it is flexible, user-friendly, and saves a lot of time. You can print from your mobile device wherever you are, whether you are at home or traveling. So, buckle up and forget those days when you needed a laptop or computer for your printing jobs.
Frequently Asked Questions (FAQs)
Do I need Wi-Fi Connection to Connect My Phone to Canon Printer?
For wireless printing, both your phone and printer must be connected to the same Wi-Fi network. You can use the Canon PRINT app to connect your phone to the printer, which can scan, print, and copy wirelessly.
Can I Use My Canon Printer with other Mobile Apps?
Yes, depending on your model, you can use your Canon printer with other mobile apps. You can use different apps like Apple AirPrint for iOS devices or Google Cloud Print for Android devices. Besides the Canon PRINT app, you can use these apps, which will allow you to print directly from your phone.
Canon Printer Setup : Unboxing and Setup Guide with ij.start.canon
Setting up your Canon TS Series, G Series, GM Series and other Canon Printers are easy, Follow the steps to setup the Canon.
1. Remove the Protective Taping
- A new Canon printer or scanner comes with protective taping, identify the places your printer is taped for shipping and remove the taping.
2. Connect the Canon printer Scanner to Power Supply
- Now, you will need to connect the printer to the included power supply cable. The Port is on the back of the printer.
3. Install Cartridges
- Install Cartridges by lifting the top part of the Printer, the cartridge slider will center the Canon Printer cartridge slot and you can gently insert the cartridges and lock them in Place.
4. Fill Up Ink Tanks
- (Optional) If you have an ink tank printer that comes with bottles of inks, You will need to fill the ink in the designated tanks up to the given maximum. Once filled you can tightly cap the bottles for reuse.
Note that ij.start.canon website automatically detects your location, region and your Operating System.
Why Is My Canon TS3522 Printer Not Connecting to WiFi?
Here are some possible common points that could be responsible for your printer not connecting to your WiFi.
- The WiFi connection is restricted for some devices.
- Your Canon printer is not able to scan for your printer.
- The printer and WiFi router are far from each other.
- Not following the correct printer connection process.
- The Canon printer faces software/firmware errors and other issues.