Are you excited about creating cute stickers with your Canon Selphy CP1500? You’re in the right place. You can design your favorite stickers on your phone and print them wirelessly from your Canon printer.
I enjoy making things myself, and I create many fun stickers with my printer. I share how I design my stickers step by step, and it feels fun and creative at the same time. Grab all the essentials, and get ready to ‘learn to print stickers‘ right now.
Step 1: Gather All the Supplies
To create stickers with your Canon Selphy CP1500, you need sticker paper that works with this printer. You can create multiple stickers per sheet by using a whole sticker paper set. This paper set includes a matching ink ribbon that works with your printer.
Step 2: Download & Install the Canon SELPHY Photo Layout App
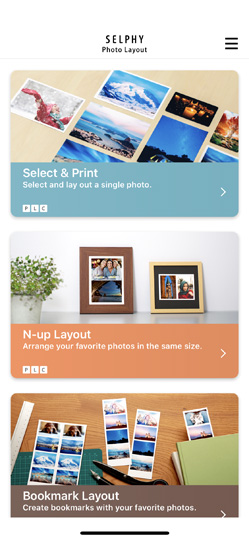
The Canon SELPHY Photo Layout app is a mobile-friendly app, and it’s very simple to install on an Android or iOS device. Here are the steps involved in installing this app.
- Launch the Google Play Store or the App Store on your mobile device.
- Search for “SELPHY Photo Layout App” in the search field, and select it from the results.
- Then, tap on Get or Install to start downloading the app on your device.
- Open the app, and allow it to access your photos and other needed permissions.
Step 3: Select and Customize Your Images
You may have a lot of photos and designs that you want to put on your stickers. The Canon app lets you edit and customize them as you prefer. Also, the photo paper for Canon printers is unique, with a sticky backing, and can be cut into any shape easily. Some Canon photo papers let you add borders or frames, depending on the type you use. Plus, you can create a collage using your best pics. Once you finish editing your design on your phone, you’re ready to print it.
Step 4: Load Photo Paper in Canon Printer
It’s time to insert the photo paper specific to your Canon printer. Canon printers use specific photo papers. Load them into your printer and make sure the right ink ribbon is installed.
If you’re a beginner and have no idea how to load papers into the printer, let me brief you on this. So, the process to load photo papers in a Canon Selphy CP1500 printer is different. It includes a separate paper cassette to load the photo papers with the glossy side up.
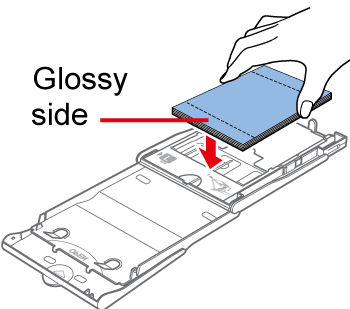
You can load up to 18 sheets in the cassette and then close it. Finally, open the front door of the printer, insert the cassette, and ensure it clicks into place.
Step 5: Connect the Canon Printer to Your Phone and Print
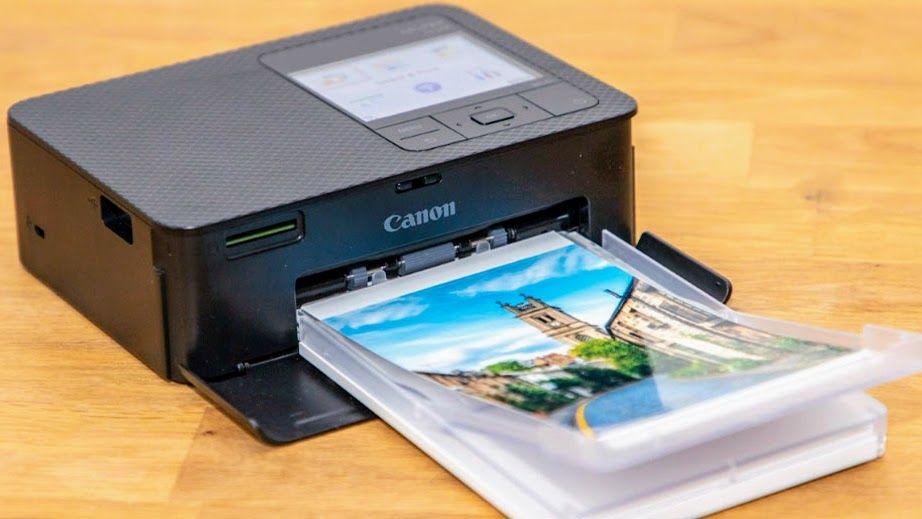
To proceed with the printing process, you need to connect your printer to the Canon app. This connects your printer to your phone. Open the app, and choose your printer from the list. Then, use your phone to scan the QR code on your printer’s screen to allow the printer to connect to your phone’s wireless network.
There you go! You’re finally ready to print. However, before printing, you can print settings such as layout and color options in the app. Send the print job, and you’re all ready to print from your app and get the customized stickers.
Step 6: Peel Off the Stickers and Use Them
Once the printer prints cute little stickers, you can peel them off the photo paper and use them on your notebooks, folders, laptops, mirrors, or even your water bottle and work desk. Making stickers becomes fun once you know the steps.
Frequently Asked Questions (FAQs)
Can I Use Any Photo Paper With My Canon Selphy CP1500 Printer?
No, you can’t use any photo paper with your Canon Selphy CP1500. There are specific photo papers based on the printer model type. Therefore, you should use only dedicated printing papers. Moreover, there are a variety of photo papers, such as regular printing papers, regular postcards, or other types of papers, that you can choose from.
What If My Canon Selphy CP1500 Printer Is Not Printing Photos?
If your printer isn’t printing photos, confirm that the ink and photo paper are correctly loaded in the cassettes. Also, check if the photo paper matches your printer model. If necessary, you can replace ink cassettes and load the photo papers again.
Troubleshooting Canon SELPHY CP1500 Wi-Fi Connection
Check Basic Setup
- Power cycle the printer and router (turn off, wait 30 seconds, turn back on).
- Make sure your router supports IEEE 802.11b/g (the SELPHY CP1500 does not support 5 GHz networks.
- Confirm your computer or phone is connected to the same Wi-Fi network.
Common Error Fixes
- Connection Failed → Double-check password and ensure router is broadcasting 2.4 GHz
- Frequent disconnects → Restart router, disable IPv6, or assign static IP.
- Printer not found on computer → Update OS and Canon drivers, then re-add printer via Wi-Fi settings.
Download Canon Printer Software
- Install the Canon SELPHY Photo Layout app (for mobile) or Canon drivers (for PC/Mac).
- When prompted, select Wireless LAN connection.
- Remove any inserted memory cards or USB drives before attempting Wi-Fi setup.
How to Create Stickers with a Canon Printer
Learn How to design your Sticker
- Open Canon Easy-PhotoPrint Editor or your preferred design tool.
- Choose a sticker template or create your own design.
- Add text, images, or logos.
- Make sure the design fits the paper size you’ll be printing on.